Formatting your book for eBook distribution can seem complicated, but there are some best practices that will make things easier. The important thing to remember: Formatting your eBook layout is about giving your readers a good experience, regardless of what device they read on.
Draft2Digital has some general and specific tips that will help.
General Limitations of our eBook Layout
Just to start things on the right note, here are some ground rules:
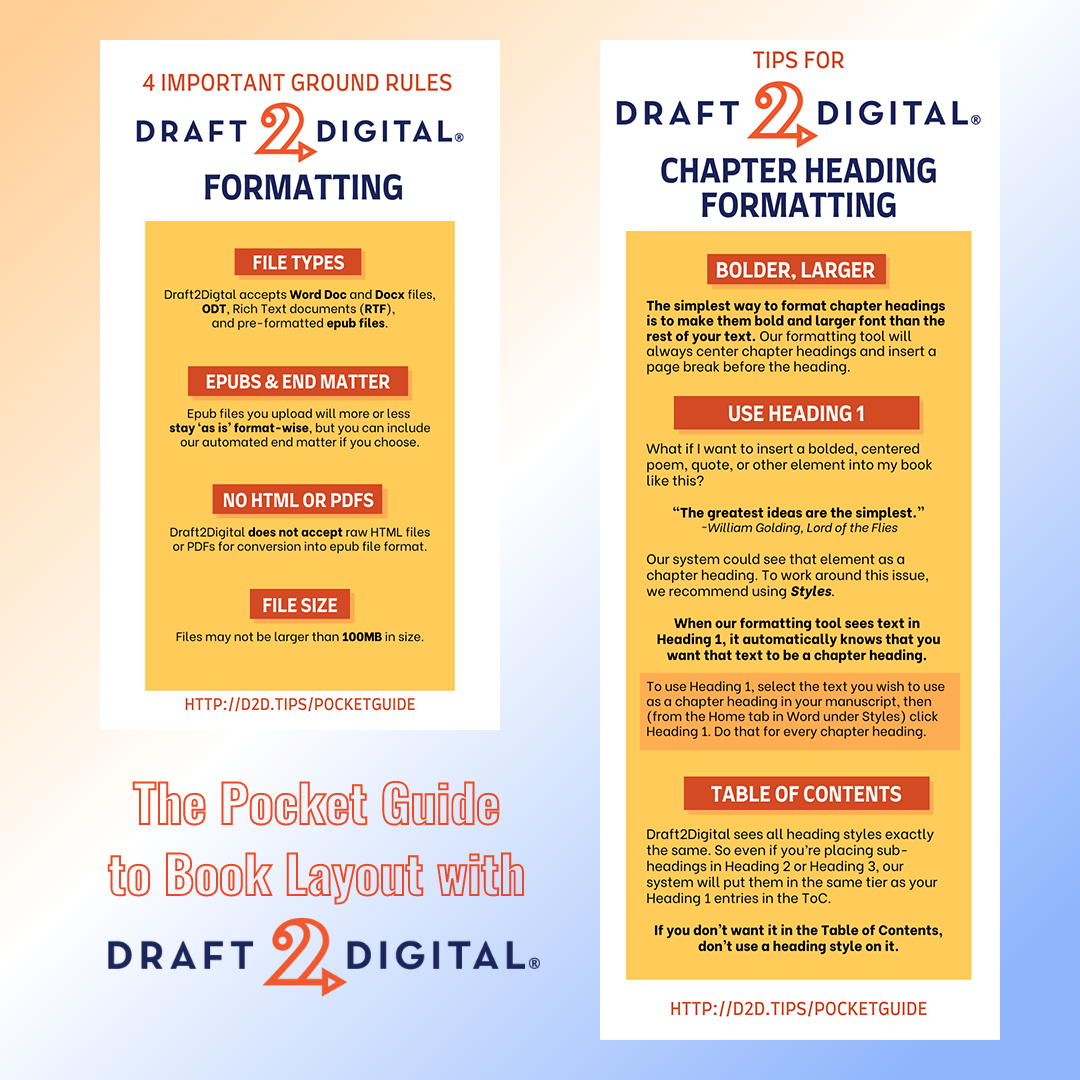
- Draft2Digtal currently accepts Word Doc and Docx files, ODT, Rich Text documents, and pre-formatted ePub files.
- ePub files will more or less stay ‘as is’, format-wise, but you can include our automated end matter if you choose.
- We cannot accept raw HTML files or PDFs for conversion into ePub file format.
- Files may not be larger than 100MB in size.
With all that established, let’s dig a little deeper into how you can use Draft2Digital’s automated conversion tool to get a clean, use-anywhere ePub.
EDITOR’S NOTE: In addition, you are welcome to download the generated ePub file from your Draft2Digital account and upload it to KDP, as KDP does accept preformatted ePub files.
How to Get Your Chapters Recognized
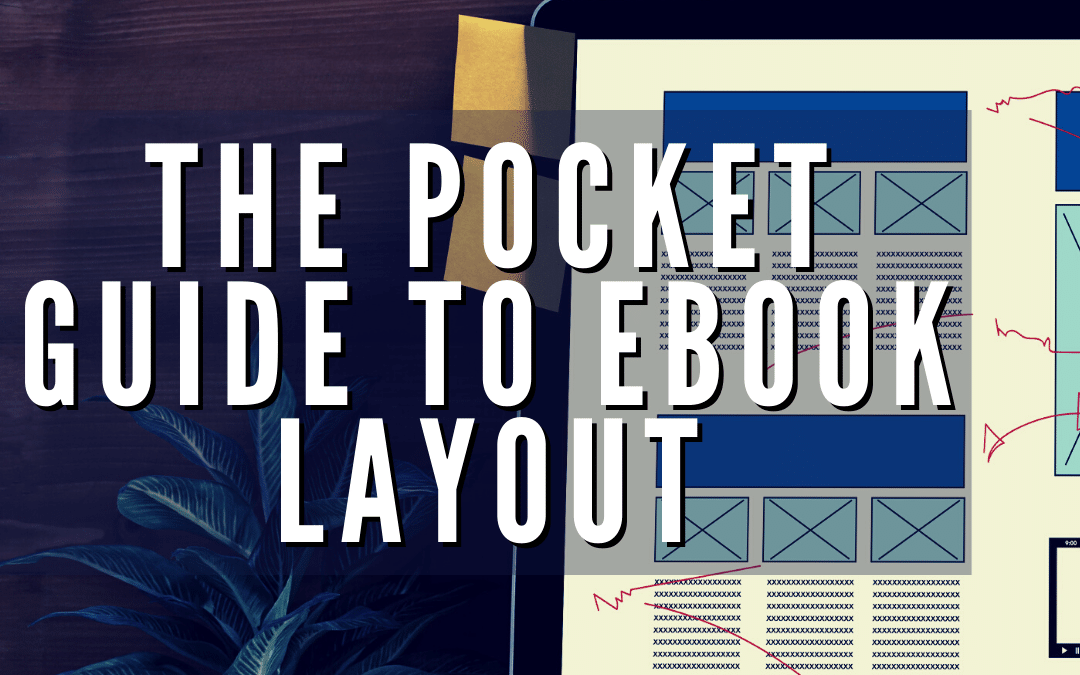
Bold and Larger
There are two very simple ways to format your chapter headings to ensure that our system picks them up. The first, and probably the simplest way to format chapter headings is to make them bold and larger font than the rest of your text. It really doesn’t matter whether you make the chapter headings centered or not (although that couldn’t hurt). However, our formatting tool will always center chapter headings and insert a page break before the heading.
Use Heading 1
There are certain instances where bold, larger text may not always work. For example, what if I wanted to insert a bolded, centered poem or another element into my book like this?
“The greatest ideas are the simplest.”
~William Golding, Lord of the Flies
In this case, it is possible that our system could see that element as a chapter heading, which is, of course, not what we want. To work around this issue, we recommend using Styles. While there are many different styles and many different uses for them in Word, only one really matters to our system. That style is Heading 1. When our formatting tool sees text in Heading 1, it automatically knows that you want that text to be a chapter heading. To use Heading 1, select the text you wish to use as a chapter heading in your manuscript, then (from the Home tab in Word under Styles) click Heading 1. Do that for every chapter heading and you’re all set.

If you choose to use Heading Styles, you need to know that our system (in its current build state) sees all heading styles exactly the same. So even if you’re placing subheadings in Heading 2 or Heading 3, our system will put them in the same tier as your Heading 1 entries in the ToC.
Rule of Thumb: If you don’t want it in the ToC, don’t use a heading style.
The Bottom Line
Formatting your files with Draft2Digital really is that simple. We’ve designed our tool to be as intuitive and user-friendly as possible. There are many other ways you can format your chapter headings to get them to work with our formatting tool. The most important things to remember are:
- Make it Obvious. Your chapter headings need to be easily recognizable from the rest of your text. Make them bold and larger or use a style to define them.
- Be consistent. Using the same formatting for every chapter heading makes it much easier for our system to recognize your headings.
Optimizing Fonts, Line Spacing, and Indentation for eBook Layout
Fonts – What You Can Change
Our system handles most common font styles such as bolding, italics, underlines, superscripts, and the like. You can also change your font size. If you’d like one line, section, or word to appear in a larger font, just set the font size for the section to a larger size. A best practice is to differentiate text sizes by at least 4 points. So if your main text is in 12 pt. font and you want the next line to be larger, set that to 16 pt. Simple enough.
Fonts – What You Can’t Change
Font Face and Family: Unfortunately, you can’t change either the font face or the font family. All ePubs generated by Draft2Digital will appear in the system default Serif font for any given device.
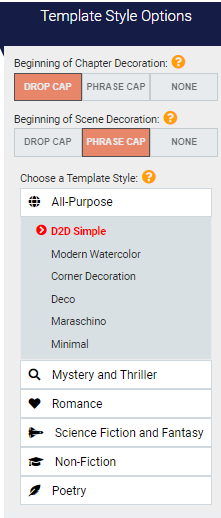
Drop Caps: There are a lot of reasons why drop caps don’t play nice in eBooks, so we created a tool that allows you to add Drop Caps and/or Phrase Caps to your book on Step 3 Preview of the book uploading process. Rather than including these within your original manuscript file, simply select the Drop Caps or Phrase Caps options to produce the best-looking ePub possible!
Line Spacing
General Line Spacing: Our conversion will automatically set the manuscript to have single space settings. However, readers who view your book will be able to adjust to double spacing using the settings on their eReader device to best suit their own reading needs.
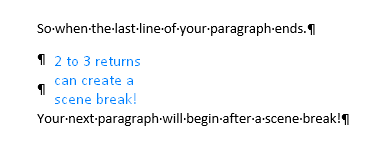
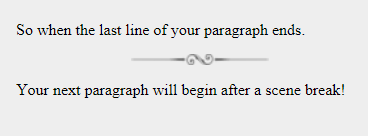
Scene Breaks: If you’d like more space between a heading or other element, you can insert a scene break. A scene break is roughly the equivalent of 3 empty lines. To force a scene break, simply use 2-3 hard returns in between lines of text. It doesn’t matter if you use 2 or 3 returns, the result will be the same either way. One hard return does nothing.
Additionally, our style options available on Step 3 Preview of the book uploading process will allow you to add themed decorative icons in place of scene breaks to help give your book some extra visual pizazz.
Page Breaks: If you want to force a page break, you can insert a page break in Word or simply use 4 or more hard returns in between lines of text. Be advised that breaking a page will ALWAYS result in a chapter break in your final navigation document, so we typically only advise using page breaks between chapters or front/end matter elements.
Indentation
By default, our system will not indent the first line of a paragraph at the beginning of a chapter or after a scene break and will indent every paragraph thereafter. This is an industry-standard and a hardcoded format in our system which can’t be overridden, with two minor exceptions:
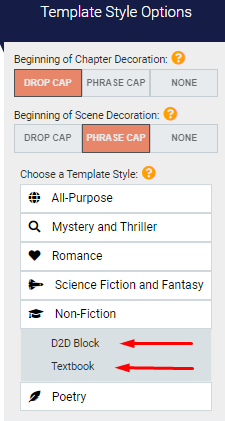
Block Formatting: For non-fiction works, we do have the ability to apply block formatting to your book. Block formatting prevents all indentation at the beginning of any paragraph, regardless of its location. This setting can be applied by selecting the D2D Block or Textbook template style to your book on Step 3 Preview of the book uploading process.
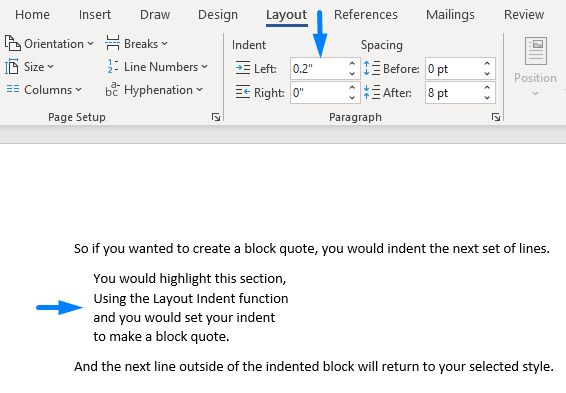
Block Quotes: If you’ve got a poem or other section you’d like to call out as a block quote while leaving the remainder of the text in a narrative fiction format, you can create a block quote by selecting the desired block of text and indenting it slightly using the paragraph tools in Word—0.2 inches will suffice. That will slightly inset the text and override the default indentation properties.
Poetry Formatting: If your book is a poetry book, we have got you covered! In your manuscript file, you can set all poem titles to be in Heading 1 Style just like you would with Chapter Titles. Stanza breaks can be created by using two or three returns in between each stanza. Then, on the Step 3 Preview of the book uploading process please select one of the various Poetry style options to ensure each poem is converted correctly.
PLEASE NOTE: Style options are applied to the entire book project.

Working with Images in your eBook Layout
General Image Advice
Be sure your images aren’t blurry. You don’t have to sweat size too much; we’ll resize any that are too large to fit our vendor’s requirements. When in doubt, a larger, more clear image, is preferential to one that is blurry or too small. We recommend an image resolution of 72-150 dpi. When inserting images into your Word doc don’t just copy and paste the images. They need to be embedded into the document itself. To do this in Word, select Insert->Picture and choose the image you want. Size them as necessary in Word until they look good to you. We’ll try to keep that sizing when we generate the EPUB. For best results, always be sure that your images are aligned “In Line with Text” and centered.
Images as Chapter Headings (Advanced eBook Layout)
If you’re wanting to use images instead of text for your chapter headings, you’ll need to take some extra steps so our system can identify where to break chapters. Begin by inserting the images at the beginning of each chapter. Note that if you’re using a flourish or other element before the text of a chapter heading, you need to have a uniquely named image for each chapter, (e.g. ch1_flourish.jpg, ch2_flourish.jpg, etc.). Now select the image in Word and then select Insert->Bookmark. Name the bookmark and then hit save. You’ll need to do that for every image preceding a chapter, using a unique name for each bookmark. Things like Ch1, Ch2, etc. work great for that. Once you’ve got all of your bookmarks built, you’ll need to build a linked table of contents. Begin the table of contents page with either Table of Contents, Content, or Contents. Next, type out the name of each chapter on a separate line and hyperlink it to its appropriate bookmark.
EDITOR’S NOTE: Draft2Digital has built a plethora of Chapter Heading Image style options available to you, with no additional steps needed to use. These options are available on Step 3: Preview, where you can select from various themed Chapter headings and Scene break images to provide a unique and professional flare to your ebook, without having to import or create images on your own.
Automated Front and End Matter
There’s no need to create a title page, copyright page, dedication page, about the author/publisher page, or also by page for your book. Draft2Digital can create all of those things for you. All you have to do is click the appropriate checkboxes on the Step 2: Layout Page, during the setup of your book, and we’ll include all of those additional pages for you. For the About the Author page, you’ll need to ensure you’ve completed your author profile in our system. Our Also By pages are built in such a way as to provide site-specific links for each unique vendor you select, ensuring buyers have a one-click shopping experience to click and purchase your next bestseller!
—
That’s the basics for eBook layout. There’s a great deal more detail that we could go into, but for most authors, these best practices will be enough. If you need more advanced eBook layout help, feel free to contact our Customer Service department at support@draft2digital.com. You can also find more helpful information in our Knowledge Base.